A "Better Boy" tomato plant will grow better and produce more fruit utilizing a self-watering container than a normal planter.
My supplies cost me about $15:
1 five-gallon bucket
A bucket lid
3 (or 4) yogurt cups (for support)
a yogurt cup or other container for dirt cup
a pvc pipe or other tube for the watering tube
scissors
Exacto knife
Other cutting tool (optional)
Drill(optional)
Potting soil(I sued miracle gro moisture control potting mix)
A plant


 |
| Take a look at the lid and the bucket. You want to cut the lid so it will fit inside your bucket and be able to rest on top of the yogurt cups, but be a tight fit. Cut your lid with scissors, or your other cutting tool, measuring often so you don't cut too much off. |
 |
| Trace the center hole for your dirt cup. You want it to nest down in the lid, but also be a tight fit. Cut it, being careful not to cut off to much. |

 |
| Tada! |
 |
| Slice up the sides of your dirt cup, using the Exacto knife or scissors. You want to make the slices vertical, and pretty evenly spaced. Watch your fingers! |
 |
| Cut one end of the watering pipe so that it is at an angle. This way if it sits directly on the flat bottom of your bucket, it will still let water flow out of it. |
 |
| Mark the position the watering pipe will go through the lid into the water chamber. |
 |
| Cut out the hole, and push the pipe through the hole. |
 |
| This is what the aparatus should look like before you push it down into the bucket. The pipe is pushed through the lid, the dirt cup usnested inside the lid, and the lid is resting on the yogurt cups for support. |
 |
| Top view |
 |
Place the yogurt cups into the bottom of the bucket for support. |
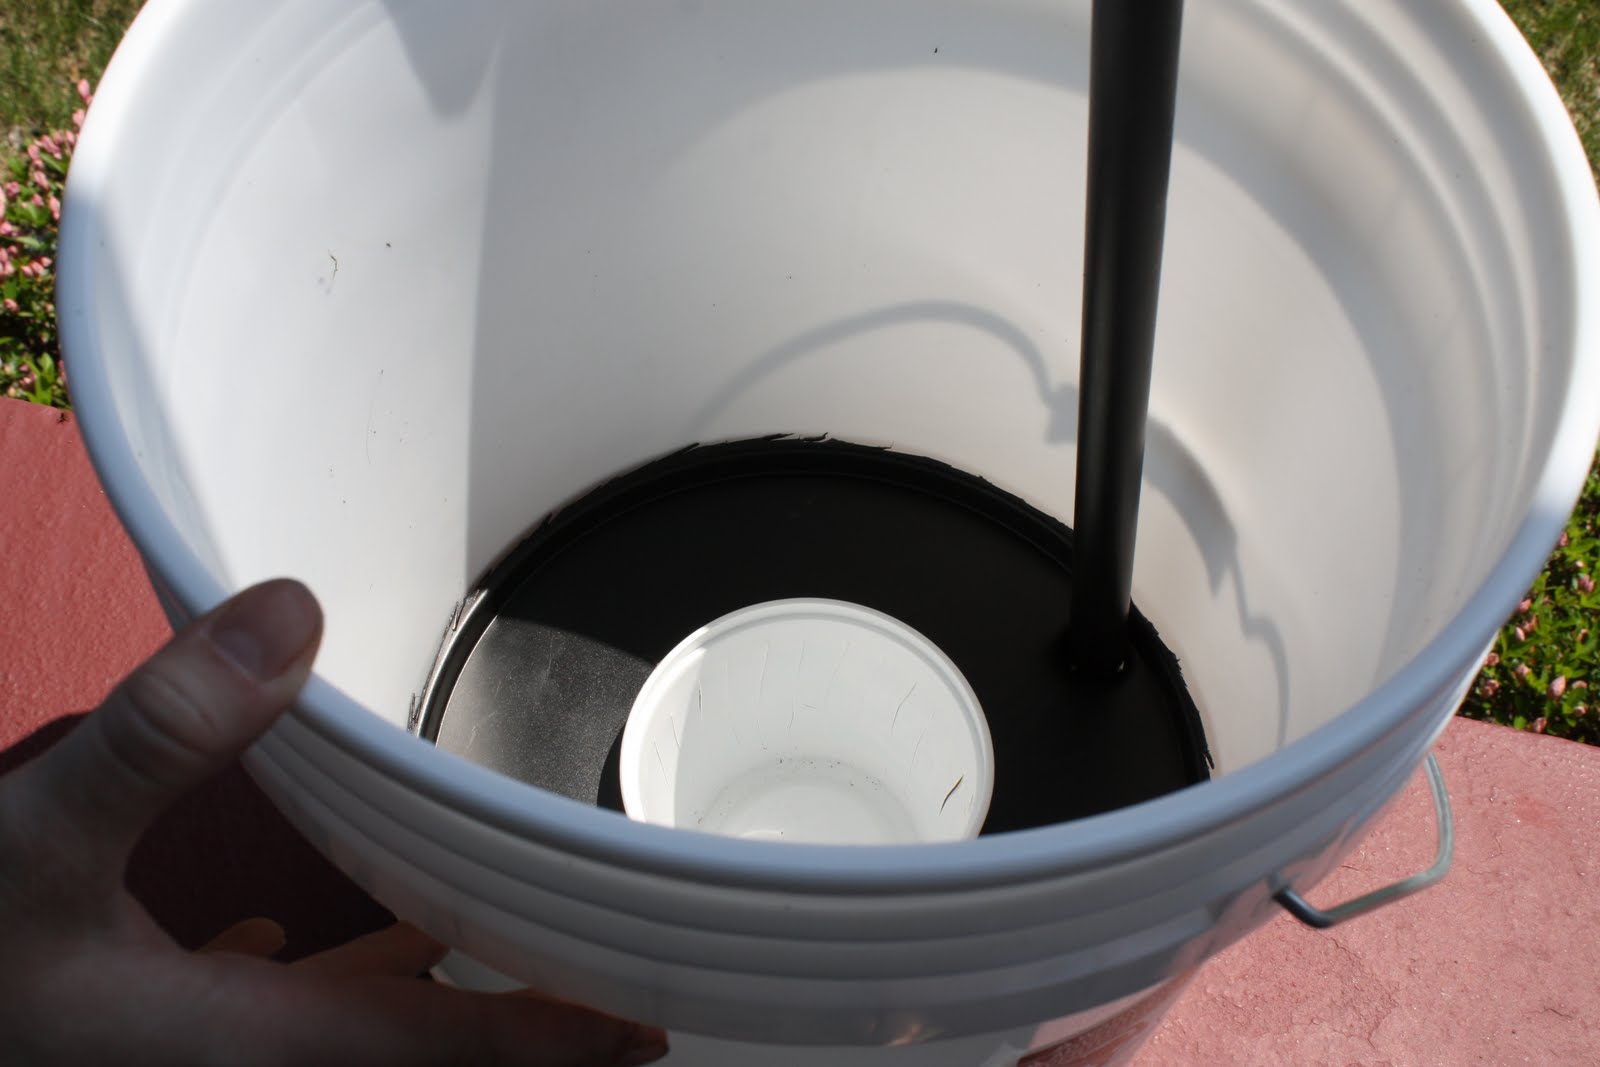 |
| Push the lid with the watering pipe attached gently, but firmly into the bucket. |
 |
| Measure a small hole for drainage just below where the lid has nested into the bucket. This will be an overflow to allow extra water to drain out of the pot, and indicate to you that you should stop watering.(You might want to place this hole on the same side of the pot as your watering tube, so you can easily see it when watering) |
 |
| Dump in some dirt into your pot. Before you add your plant, stir some water in and mix it up into a damp mixture. |
 |
| This "Better Boy" tomato came in a biodegradable pot that you are supposed to plant right in the dirt. |
 |
| I added a small pudding cup "funnel" for easier watering |
 |
| I gave this a good watering, until I could see the water coming out of the overflow hole. |
The way this works is the soil will fill your dirt cup and the chamber above it, while the dirt cup will hang suspended in the bottom water reservoir. The water will be drawn into that dirt cup through the slits and pulled upwards towards the roots of the plant as the soil begins to dry out. This is supposed to deliver moisture more consistently as the plants need it for a longer period of time. This method will also allow the soil to remain light and airy, not compacted.
I also made a planter for the other tomato plant, cutting one small hole in the bottom of the bucket for drainage, and placing it in a saucer to catch excess water from the pot.


Tada! May the best pot win!
Three weeks later, here is the update on the self-watering planter experiment:

The one on the left is the self-watering pot, and the one on the right is the regular pot in a tray. Both are doing extremely well, although the self-watering one is about 3 inches taller and has thicker, longer branches(28 inches). I Kind of mangled these as I crammed them into tomato cages today. Note to self: ALWAYS put tomato cages on tomatoes when they are small and easy to manage! I water these about once or twice a week, less if we get a lot of rain. With the tomatoes I have planted in the ground, I have to water about every other day or every two days before they start looking wilty.
You are so good!
ReplyDeleteI loved seeing your little bare toes! you are really good at doing the step by step documentation! How much did it cost for your materials roughly?
ReplyDeleteAbout $15 including the dirt and the plant
ReplyDeletethis is so awesome! I"m gonna do it this weekend. Thanks for paving the way!
ReplyDeleteUpdate: Both tomato plants have over doubled their size! 14-15 inches tall! I have only watered each of them once since I planted them, but it has rained almost every day. The two in pots are definitely doing better than the on I have planted in the ground that has only grown a few inches in over a month! I have also had to water it pretty frequently, in spite of all the rain we've been getting!
ReplyDelete