This year I want to try growing potatoes in containers. I've been saving some russet, Yukon gold, and red potatoes in my pantry to use as seed potatoes. I've looked around at different options on how to grow them.
1.Tower made of wood that you build on as they grow:
http://tipnut.com/grow-potatoes/
2.A useful how to for planting in containers:http://containergardening.about.com/od/vegetablesandherbs/ss/ContainerPotatoes.htm
3.towers made of chicken wire and cedar screening http://www.sunset.com/m/garden/fruits-veggies/how-to-grow-potatoes-in-towers-00418000068323/
Wednesday, April 18, 2012
Tuesday, June 28, 2011
June!
 |
| Strawberry lemonade Zinnia from Burpee Seeds |

 |
| Beans! |

 |
| My orange tree with some romaine lettuce I planted from seed |
 |
| Seedless grapes |
 |
| Cucumber Salad Bush from Burpee Seeds |
 |
| A little cuke from my potted cucumber plant |
 |
| My giant lettuce |
 |
 | |
| Me and my Raspberry Lemonade Zinnias and some native perennials from my driveway(the Silver plants with red little flowers) |
Sunday, June 5, 2011
Garden Update
So I have noticed a problem with my hanging strawberry baskets. In comparison to the strawberries I have in pots(which sometimes have the problem of strawberries touching the dirt, which makes them rot) the hanging strawberries don't have that problem. However, they do have the problem of draining to quickly. The water runs right out the bottom of them and the dirt is always bone-dry. The strawberries that are on these plants are tiny and slightly on the shriveled side. I am thinking that they need more water to produce larger fruit. T That and they lose a lot of nutrients in the soil by the water just running straight through them. I set some other plants below them to catch the water, and the plants in those containers are exploding with growth.


 |
| Seedless grapes on a trellis I made from sticks |
 |
| Strawberries in a regular pot |
 |
| One of the pots that catches runoff from the strawberries |
Tuesday, May 31, 2011
Giant Trees from Sunny California!

They came in weird little tubes, and he said they cost $10 each.

The Giant Sequoia Tree-
Right now my little giant is 5 inches tall but from my caculations it will grow very quickly if I don't kill it!
I learned a lot from this website on Sequoia Trees:
Giant Sequoia Trees
They can grow to be 300 feet tall and over 3000 years old.
This Giant Sequoia will be 20 inches wide and and 20 feet tall in 202,
100 inches wide and 100 feet tall in 2061!
 |
| "I think I can, I think I can I think I can!" |
Coastal Redwood-
Can grow up to 350 feet tall

These prefer a milder climate than the Sequoia's and require warmer temperatures in the winter to survive. I don't know if I will be able to keep this alive since they are said to not tolerate temperatures at 0 degrees. BUT- if it DOES live, it can put up to 6 feet of height a year, for
60 feet tall in 10 years (2021)
300 feet tall in 50 years (2061)
I'm excited to see how it goes!
Sunday, May 8, 2011
Self-watering veggie pot experiment
I attended a fantastic class from a meet-up group here in Pittsburgh : Pittsburgh Garden Experiment where I learned all kinds of great facts about container veggie gardening! My husband and sister-in-law attended and we were all really intrigued by what we learned. In the class they told us about fertilizer, soil, what type of containers work best with what, and how to make a self-watering container for veggies out of a 5-gallon bucket. The speaker made the statement that tomatoes grow better in one of these containers than in the ground. And that these containers were better than growing in a regular container, because instead of watering from the top(which compacts the soil and makes it difficult for the roots to grow and breathe), you are allowing moisture to be drawn up from the bottom as-needed. So here is my hypothesis I am testing:


The way this works is the soil will fill your dirt cup and the chamber above it, while the dirt cup will hang suspended in the bottom water reservoir. The water will be drawn into that dirt cup through the slits and pulled upwards towards the roots of the plant as the soil begins to dry out. This is supposed to deliver moisture more consistently as the plants need it for a longer period of time. This method will also allow the soil to remain light and airy, not compacted.
I also made a planter for the other tomato plant, cutting one small hole in the bottom of the bucket for drainage, and placing it in a saucer to catch excess water from the pot.


Tada! May the best pot win!
Three weeks later, here is the update on the self-watering planter experiment:

The one on the left is the self-watering pot, and the one on the right is the regular pot in a tray. Both are doing extremely well, although the self-watering one is about 3 inches taller and has thicker, longer branches(28 inches). I Kind of mangled these as I crammed them into tomato cages today. Note to self: ALWAYS put tomato cages on tomatoes when they are small and easy to manage! I water these about once or twice a week, less if we get a lot of rain. With the tomatoes I have planted in the ground, I have to water about every other day or every two days before they start looking wilty.
A "Better Boy" tomato plant will grow better and produce more fruit utilizing a self-watering container than a normal planter.
My supplies cost me about $15:
1 five-gallon bucket
A bucket lid
3 (or 4) yogurt cups (for support)
a yogurt cup or other container for dirt cup
a pvc pipe or other tube for the watering tube
scissors
Exacto knife
Other cutting tool (optional)
Drill(optional)
Potting soil(I sued miracle gro moisture control potting mix)
A plant


 |
| Take a look at the lid and the bucket. You want to cut the lid so it will fit inside your bucket and be able to rest on top of the yogurt cups, but be a tight fit. Cut your lid with scissors, or your other cutting tool, measuring often so you don't cut too much off. |
 |
| Trace the center hole for your dirt cup. You want it to nest down in the lid, but also be a tight fit. Cut it, being careful not to cut off to much. |

 |
| Tada! |
 |
| Slice up the sides of your dirt cup, using the Exacto knife or scissors. You want to make the slices vertical, and pretty evenly spaced. Watch your fingers! |
 |
| Cut one end of the watering pipe so that it is at an angle. This way if it sits directly on the flat bottom of your bucket, it will still let water flow out of it. |
 |
| Mark the position the watering pipe will go through the lid into the water chamber. |
 |
| Cut out the hole, and push the pipe through the hole. |
 |
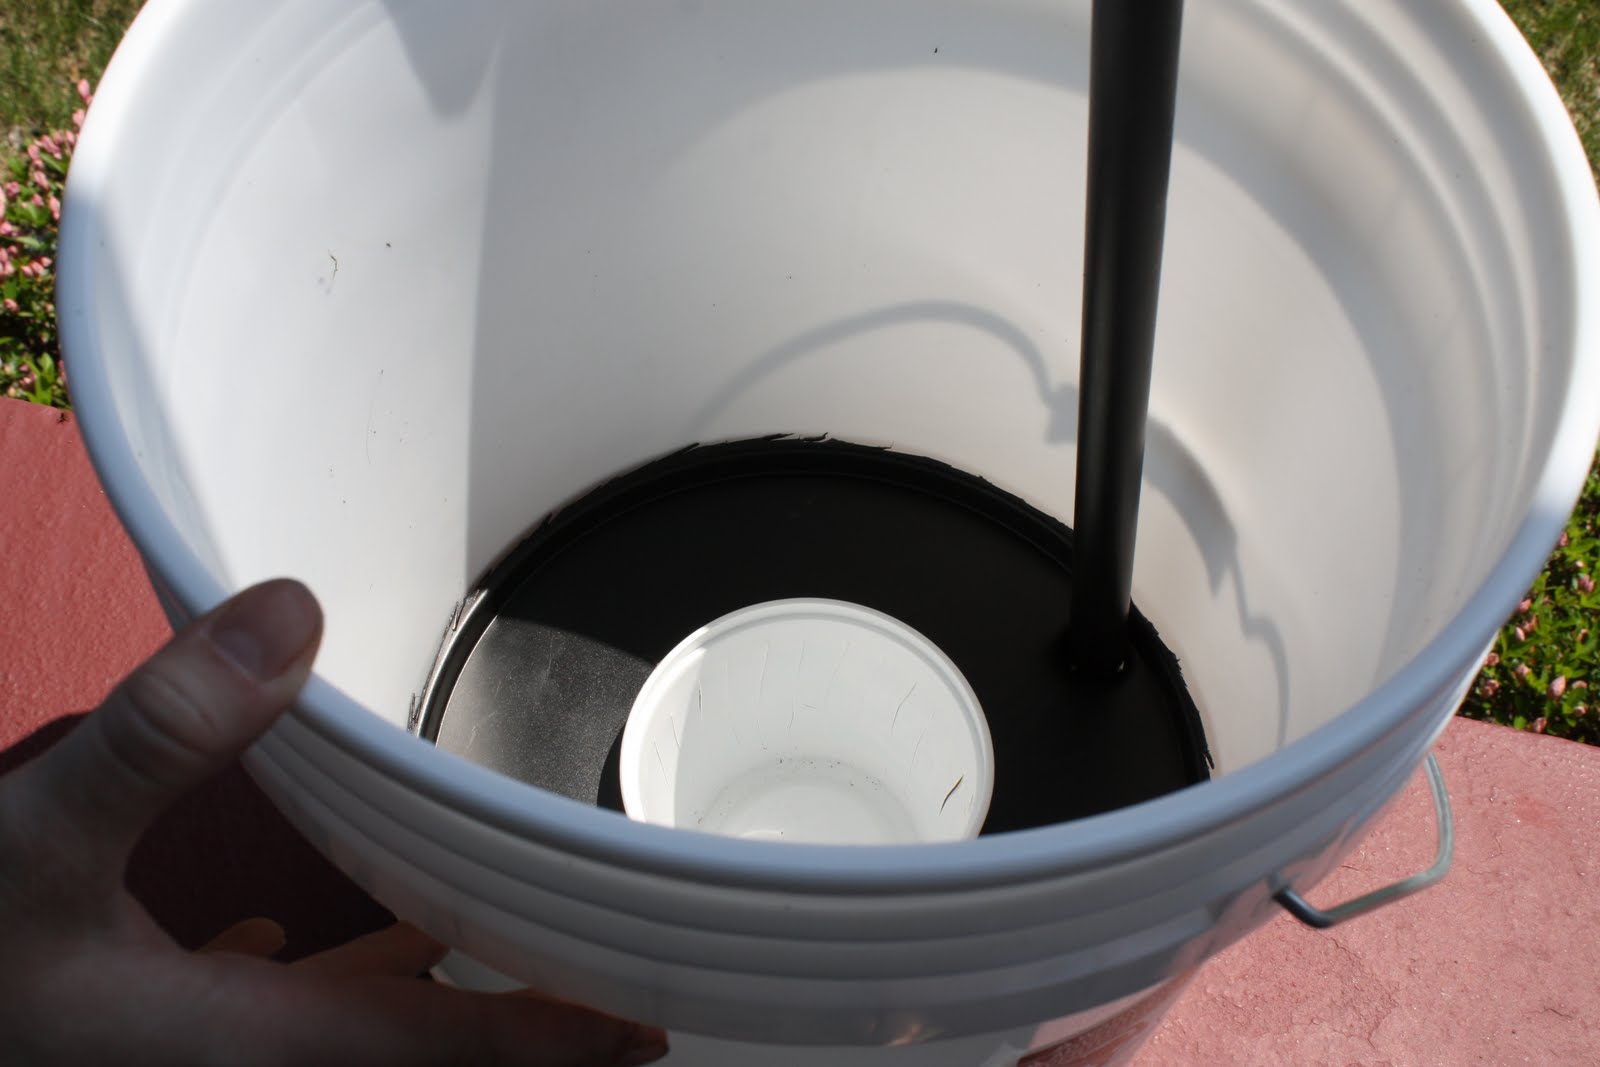
| This is what the aparatus should look like before you push it down into the bucket. The pipe is pushed through the lid, the dirt cup usnested inside the lid, and the lid is resting on the yogurt cups for support. |
 |
| Top view |
 |
Place the yogurt cups into the bottom of the bucket for support. |
 |
| Push the lid with the watering pipe attached gently, but firmly into the bucket. |
 |
| Measure a small hole for drainage just below where the lid has nested into the bucket. This will be an overflow to allow extra water to drain out of the pot, and indicate to you that you should stop watering.(You might want to place this hole on the same side of the pot as your watering tube, so you can easily see it when watering) |
 |
| Dump in some dirt into your pot. Before you add your plant, stir some water in and mix it up into a damp mixture. |
 |
| This "Better Boy" tomato came in a biodegradable pot that you are supposed to plant right in the dirt. |
 |
| I added a small pudding cup "funnel" for easier watering |
 |
| I gave this a good watering, until I could see the water coming out of the overflow hole. |
The way this works is the soil will fill your dirt cup and the chamber above it, while the dirt cup will hang suspended in the bottom water reservoir. The water will be drawn into that dirt cup through the slits and pulled upwards towards the roots of the plant as the soil begins to dry out. This is supposed to deliver moisture more consistently as the plants need it for a longer period of time. This method will also allow the soil to remain light and airy, not compacted.
I also made a planter for the other tomato plant, cutting one small hole in the bottom of the bucket for drainage, and placing it in a saucer to catch excess water from the pot.


Tada! May the best pot win!
Three weeks later, here is the update on the self-watering planter experiment:

The one on the left is the self-watering pot, and the one on the right is the regular pot in a tray. Both are doing extremely well, although the self-watering one is about 3 inches taller and has thicker, longer branches(28 inches). I Kind of mangled these as I crammed them into tomato cages today. Note to self: ALWAYS put tomato cages on tomatoes when they are small and easy to manage! I water these about once or twice a week, less if we get a lot of rain. With the tomatoes I have planted in the ground, I have to water about every other day or every two days before they start looking wilty.
Sunday, May 1, 2011
Thinning seedlings, and outside planting
 |
| In this photo I have two containers (on the left)of zinnias from Burpee Seeds that I started from seed using the paper towel method this week. On the right I have some Summertime lettuce (also Burpee Seeds, started last week with the paper towel method). They spent their first night outside last night, and this is how they look this morning. The lettuce seems to be a little weakened, but I think it will be all right. The Zinnias show no signs of distress. |
 |
| In this pot I have a watermelon seedling(far left), rainbow coleus(middle), and two snow-in-summer seedlings. Initially I had all of these coleus in one tiny pudding cup since I was having a hard time getting any to sprout whent hey were planted one-to-a-pot. They seem to sprout better when it is a bunch of them planted close together, and then thinned out once they have their first set of leaves, as I did here. These have been on my front porch in a sunny spot all this week without bringing them indoors. Temperatures have gone down to nearly 40 degrees at night and they seem to not be suffering,except for the watermelon seedling. When I check it in the morning it's stem looks weak, sort of transparent, and it is bowed low as if it can't bear the weight of its leaves. But it wasn't lying down, so I let it be. Within a few hours of warmer morning sun, it perked right up, as you see here. |
 |
| These blue-eyed Susan seedlings were not started with the paper towel method, and of the 14 seeds I planted, I only had 3 seedlings ever sprout. I have let these sit outside on my somewhat sheltered porch overnight (for a week now, with temperatures dropping to 40 degrees at night, including some high winds and storms), and let them sit on the railing during the day to get some sun. Thy are very sturdy at this point and I would feel comfortable planting these directly in the ground if I could think of where I want to put them. |
 |
| In this pot I have one of my grape vices with some seedlings sharing the pot. On the left edge I have dichondria from Burpee Seed started in a seedflat sectional. I planted 9, but only 3 sprouted. Toward the top I have English Ivy that I bought as a plant. I don't think it is going to survive, I'm pretty sure the high winds we had this week whipped it around too much, and I hadn't thought to move this pot to a more sheltered place. The other seedlings in the pot seem to have taken it fine, but maybe this was because they were shorted to the ground and further in on the pot. In the center I have some pansies I started in soil. |
 |
| This week I built up the retaining wall here to help hold back more of the soil. I also put in garden edging and some cypress mulch. I transplanted all of my hostas from last year at the top of the wall to also help with erosion. Around the corner I planted my large watermelon plants I started from seed, and I also planted some sweet potato vine I bought from the nursery. I also planted early girl tomato plant from the nursery and some peas I started with the paper towel method.(They are hidden in the mulch, marked with the bamboo steaks) |
Friday, April 29, 2011
Seed Starting!
This year I decided I was going to save money by starting my plants from seed. My thoughts were, why spend $3-$10 per plant if you can spend $1-$3 for a whole bunch of them? I really thought I was onto something! So in the beginning I planted seedlings in any recycled container I could find, using miracle gro premium potting soil.
Then I tried planting in seed flats, then moved peat pellet seed trays, and finally I have found a method that works best of all!
The wet paper towel method. I have had amazing success with this! No more faithfully watering, waiting for 10-20 days for seeds to sprout, wondering what the heck is going on under that dirt.
1.Get a water-tight containter (my favorite was a plastic muffin pan rack). A styrofoam plate will even work.
2. Fold over a paper towel. Open it up so you can put the seeds in between the layers.
3. Spread your seeds on top of the paper towel and fold the top layer over so you have made a little pocket with the seeds inside.
4. Label your seeds so you know whats in there, and pour water over your paper towel, submerging the whole paper towel. You want to keep this pretty wet, but don't worry about your seeds drowning. As long as you plant your seeds pretty soon after they sprout they will be fine. Place the container with teh paper towle and seeds in a safe, warm place. (warmer than 60 degrees seems to work well)
This is a great method for having high germination rates(meaning more of you seeds will actually sprout) I have had nearly 100% germination with this method! Plus if you're anxious, nosey, or just impatient for results, this is the way to go as you can peek under yout paper towel as many times you want to check the progress of the seedlings. Depending on your seeds, you will see them crack open within a day or so, then a day or two later roots, then leaves. Once you see you have leaves, make sure you plant them. I like to transplant them to a shallow, wide mouthed container like a sandwich tupperware or cut-in-half milk jug with drainage holes. spread your little seedlings out, cover lightly with soil, and water gently. Check them in another day or two and you will see them emerging out of the dirt. Once the seedlings are up and have their first set of leaves on them, you can thin them out of the tray, taking the strongest-looking ones only, and plant them into a container by themselves.
At this point, you want to make sure they get PLENTY of light! If not, they will look weak, scraggly, and wimpy.
These seedlings were started too early, and didn't get enough light:
Two hours of being in the sun outside reduced them to this:
Make sure when you do start putting them outside they are sheltered from the wind, sun and heat. Try putting them outside in the late afternoon, where they won't get direct sunlight baking down on them. And definitely keep the soil slightly moist. Once they start getting used to the harsh outside world, you can put them outside for longer, with less shelter, with more sunlight.
 |
| Watermellon planted in Mountain Dew bottles with bamboo stake supports. The edges of the bottles were sharp, and cut the plants when they rubbed, so I added the supports. These little planters did very well lined up on my windowsill. |
Then I tried planting in seed flats, then moved peat pellet seed trays, and finally I have found a method that works best of all!
The wet paper towel method. I have had amazing success with this! No more faithfully watering, waiting for 10-20 days for seeds to sprout, wondering what the heck is going on under that dirt.
1.Get a water-tight containter (my favorite was a plastic muffin pan rack). A styrofoam plate will even work.
2. Fold over a paper towel. Open it up so you can put the seeds in between the layers.
3. Spread your seeds on top of the paper towel and fold the top layer over so you have made a little pocket with the seeds inside.
4. Label your seeds so you know whats in there, and pour water over your paper towel, submerging the whole paper towel. You want to keep this pretty wet, but don't worry about your seeds drowning. As long as you plant your seeds pretty soon after they sprout they will be fine. Place the container with teh paper towle and seeds in a safe, warm place. (warmer than 60 degrees seems to work well)
This is a great method for having high germination rates(meaning more of you seeds will actually sprout) I have had nearly 100% germination with this method! Plus if you're anxious, nosey, or just impatient for results, this is the way to go as you can peek under yout paper towel as many times you want to check the progress of the seedlings. Depending on your seeds, you will see them crack open within a day or so, then a day or two later roots, then leaves. Once you see you have leaves, make sure you plant them. I like to transplant them to a shallow, wide mouthed container like a sandwich tupperware or cut-in-half milk jug with drainage holes. spread your little seedlings out, cover lightly with soil, and water gently. Check them in another day or two and you will see them emerging out of the dirt. Once the seedlings are up and have their first set of leaves on them, you can thin them out of the tray, taking the strongest-looking ones only, and plant them into a container by themselves.
 |
| Day 3 |
 |
| Day 3 Zinnias |
 |
| Day 4 Oriental Poppies |
 |
| Day 4-after starting the paper towel method! Romain lettuce. Notice these seedlings are strong and upright. |
These seedlings were started too early, and didn't get enough light:
 |
| Add caption |
Two hours of being in the sun outside reduced them to this:
 |
| Add caption |
Subscribe to:
Posts (Atom)